All posts by Rob

Rob is a freeskier and surfer; so you will either find him in the mountains in winter or the Atlantic in summer. One of life's true adventurers he is happiest in the great outdoors!

Picture Organic Wetsuits

Picture Organic is a French based company who have an established history in sustainably produced technical mountain apparel. At 11 years old they have spent the last decade revolutionising how the ski industry manufactures their clothes. Renowned for unique styling combined with the latest technology their popularity has grown year on year. In the last couple of years, it has been exciting to see them apply their knowledge to the wetsuit market, with eye catching designs that offer incredible performance with a sustainable approach.

What’s new?

Picture Organic have developed a neoprene called Eicoprene that will feature in all their wetsuits this year. Eicoprene is made from 30% recycled tyres and 70% limestone. All the linings are made from recycled polyester and connected using Aqua-A glue, a water-based glue which is solvent free. These technologies ensure that you are purchasing a wetsuit with minimal environmental impact.

Eicoprene has been rigorously tested by the Picture Organic team, from cold winter days off the UK coast to summers in the SW of France. Durability has been a priority in the design process with the belief being that the longer your suit lasts the better it is for the environment.

female surfer catching a wave off Cornwall.
Picture Organic Women’s Oksana 3mm 2mm Dark Blue Sparrow Full Wetsuit

How do they perform?

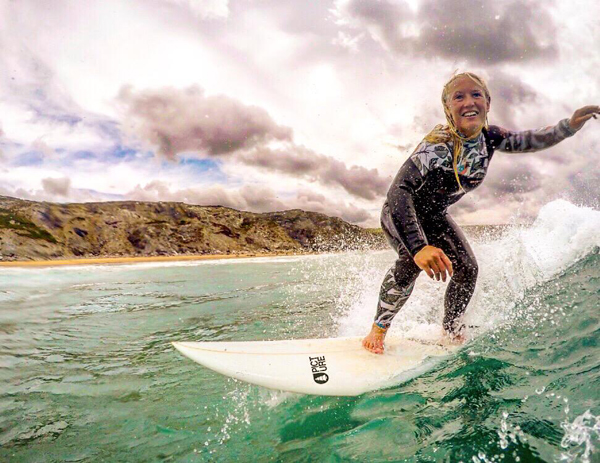
Eicoprene is an extremely flexible material that performs incredibly for a whole host of activities. Whether you are surfing, Sup’ing or wild swimming they will allow you move with ease through a full range of motion. The wetsuits have taken design ideas from triathlete suits offering features that haven’t been used in surfing before. The suits have “Motion Pattern” which removes seams from under the arm, the chest and around the shoulders increasing mobility so you can perform at your best. They have also used a silicone coating called Power Grip which increases resistance in the water meaning increased efficiency for paddling.

We have a large range of their latest offering from 1.5mm wetsuit tops through to 4/3mm winter suits for both men and women. If you are looking for a high-performance sustainable wetsuit Picture Organic will have you covered.

Base Surf Lodge

Facebooktwitterredditpinterestlinkedinmailby feather

Picture Organic Clothing Welcome Snow Jacket and Pant Review

The Picture Welcome Snow Jacket and Pant are designed for those wanting the best technical features with the lightest possible performance. Ideal for ski tourers and free-riders this is the ultimate technical outerwear for ups and downs.

Picture Organic Clothing have grown from strength to strength in the 10 years since their inception. At their humble beginnings the company was the idea of three friends who wanted to make technical mountain wear with a strong eco-friendly ethos. Now they are at the forefront of organic and eco-friendly apparel in both the mountains and oceans.

Welcome Snow Jacket

The Welcome Snow Jacket is at the upper end of the range and hosts a wide array of technical features. The jacket is a 20K/15K shell with fully taped seams keeping you dry all day no matter what the mountain throws at you.  The shell is designed to go hand in hand with mid layers and the breathability means you will be able to control your temperature on the climbs too. Both the jacket and pant have large vent systems to further assist keeping you cool on those Spring ascents.


The Welcome jacket is designed to go hand in hand with mid layers and the breathability means you will be able to control your temperature on the climbs too.

The hood  for the jacket is helmet compatible and also has an adjustable 3D construction. This means that when you move so does your hood, a simple but great feature giving you better peripheral vision on the slopes.

The jacket comes with a detachable snow skirt and hand gaiters with adjustable cuffs. This means that when the best powder day of the season arrives you don’t have to worry about snow getting to your base layers and concentrate more on those rooster tail turns! The detach ability of the skirt is ideal for those trying to keep the weight down on multi day tours.

The design of the jacket is sharp with a performance fit. For those of you who have spent any time in the alps will be familiar with Pictures contemporary designs and bold colour ways. All zips are YKK, and come with a lifetime guarantee.

Welcome Snow Pant

The snow pant is made from the same, aptly named, DryPlay material and fully taped seams. One of the unique and highly functional features in the pant is Picture’s patented I-Fit system. Essentially a draw cord in your pocket that will allow you to adjust the height of your boot cuff. This is both handy when using crampons to protect the bottom of your pant or dancing on tables at Apres!

Eco-Friendly

So that’s the performance features but what exactly does eco-friendly technical outerwear mean. Well Picture Organic Clothing strive to minimise the impact their clothes are having on the environment and here is how. The majority of the shell is made up from recycled polyester, which results in a large men’s jacket consisting roughly of 50 recycled bottles. If this isn’t enough Picture have invested heavily in developing a biodegradable water repellency across their whole line. Traditional DWRs (Durable Water Repellency) consist of contaminants such as PFC’s which when washed off your jacket stay in the environment and pollute the whole water system. There have been some terrible findings in water around some of the biggest ski resorts due to DWR’s washing off of outerwear. Picture’s new DWR Eco-Elite is totally biodegradable so after a greats days riding your conscience can rest knowing you haven’t had a negative impact on the environment.

I have been using the Welcome technical outerwear for the 2019 season and it has been highly adaptable in a variety of condition. From the powder days in January to one of the warmest February’s I can remember. It is definitely a great suit for those looking for the higher end technical features and performance whilst maintaining fantastic environmental principals.

Facebooktwitterredditpinterestlinkedinmailby feather

Refuge de La Gramusset – France

With warm temperature and low snowfalls it hasn’t been the powder full winter we dreamt of but that doesn’t mean you can’t get out on the hill and have a great time. As Jeremy Jones said “if you need to have powder on the mountain to have fun then you are in the wrong sport”. So with that in mind we have been embracing the spring conditions and have been taking advantage of the low avalanche risk and pushing further into the backcountry than would usually be possible in January.

Refuges are one of the great traditions of the Alps and provide great opportunities to explore the mountains in winter. Usually allocated with a guardian to host walkers in the summer months and provide them with a warm meal and comfy bed; the winter experience is a bit more DIY. Usually only one room will be open with a log store, fire, gas stove and some blankets to keep the worst of winter away.

kettle on stove
Once the fire is lit and the refuge is heating up you must start to melt snow for water. With three of you this becomes a full-time job due to the small quantities of water that snow holds.

This week we planned to visit the Refuge Gramusset it sits at the north east end of the Aravis Chain and is located under the dominating Pont Percee peak. We started our tour below the tree line in the small hamlet of Troncs. The climb up is 1000m of vertical and the first 450m is a steep pitch up through the forest avoiding a large exposed cliff line over the ravine below. The forest trail had limited amounts of snow and we spent a fair bit of time trying to dodge tree roots and fallen branches. Once out of the forest and into the high alpine the conditions began to improve. The final 550m is a testing 40 degree slope all the way to the refuge. One of the most enjoyable aspects of ski touring is the continual puzzle of choosing the safest route up. This particular face had a variety of challenges with the constant steep gradient and multiple exposed cliff bands it was both a demanding and rewarding climb.

Having reached the Refuge just before sunset we had time to start cutting logs and getting the fire going before nightfall. Once the fire is lit and the refuge is heating up you must start to melt snow for water. With three of you this becomes a full-time job due to the small quantities of water that snow holds. Refuges tend not to have electricity and make for long evenings with the sun going down at 5.30 in winter and not showing itself till 7 in the morning. However this simple existence is the most magical part of the experience, how many opportunities in modern life provide you with such a chance to be in the present. Even one night living like this reaffirms the amount of distractions society has built for itself. It may not be everyone’s idea of a break but the simplicity of being in the mountains and providing for yourself is an incredible experience and offers true escapism.

stars at night in the mountains
Even one night living like this reaffirms the amount of distractions society has built for itself. It may not be everyone’s idea of a break but the simplicity of being in the mountains and providing for yourself is an incredible experience and offers true escapism.

Around 11pm the wind started to really pick up and the metal roof was chattering by this time you are torn between staying under your blankets or getting another log on the fire. You dose in and out of sleep for what seems like an eternity waiting for first light to have a glimpse at the conditions.

Unfortunately we woke to strong winds and the couloirs above the refuge looked ominous. We made the decision to head back down before conditions worsened. The ski down covered some great terrain however the snow wasn’t great with lots of exposed rocks. Sometimes things change in the mountain but you are always inspired by something when you venture into them. You make mental notes of possible lines to ski in the future or wonder what terrain lies over the next peak. It truly is never-ending and that is the greatest aspect of ski touring you are opening up opportunities for discovery all the time.Facebooktwitterredditpinterestlinkedinmailby feather

Dakine Prospect Bib Snow Pants Review

As people back home have probably heard Europe has had a slow start to the season with unseasonably high temperatures throughout December. However when it has snowed this year it has been falling intensely with two 50 cm plus snow falls in 24 hour time periods. This has provided us with a wide variety of condition to test the Dakine Prospect Bib Snow Pants!

Dakine Prospect Bib Snow Pants

The first impression you get from the Prospects is how incredibly light they are compared to other winter pants. This lightness provides a fantastic feel when skiing and touring as you aren’t restricted by any heavy materials. They are built from 3 layer Gore-tex which provides the trousers with a formidable shell against all conditions. Despite being out on a few torrential ski days this year I am yet to see the trouser soak through even when sat on wet chairlifts. The bib design is  a great feature for any powder lovers as it ensures protection of your base layers even on the deepest of days and the occasional tumble!

dakine prospect bib snow pants
The bib design is a great feature for any powder lovers as it ensures protection of your base layers even on the deepest of days and the occasional tumble!

However it is not just in miserable conditions that the Prospect shines. I have been touring in them in +15 and there lightweight breathability means that they control your temperature very well. With multiple vents  featured on the trouser you are able to make quick adjustments whilst on the route up as well as insulating your warmth at the top.  

We have been skiing for eight weeks now and as stated the condition have been tricky with plenty of grass and rock on show. This has highlighted one of best features of the Prospect.The reinforced cuffs at the bottom of the legs have made them considerable more durable than other snow pants. Despite being scraped between rocks and ski boot on numerous occasion they are yet to show any sign of wear and the strong boot gators stay firmly attached to the boot.

Overall I would say that the Dakine Prospect Bib Snow Pants are a great piece of kit which when utilised with good base layers provides exceptional performance in the majority of condition a mountain can throw at you.Facebooktwitterredditpinterestlinkedinmailby feather

Basic Tools For The Backcountry

In the last decade there has been a revolution in ski and snowboard design that has enabled more and more participants to access the backcountry. With wider templates and more forgiving tip and tail shapes riding powder has never been so accessible. The joys of getting off the piste and into the mountains is the very essence of skiing’s (snowboarding’s) roots and for many has become a healthy addiction. However as more of us dream of escaping the lift queues and laying down first tracks, what are the risks involved and how can we minimise them.

This article will provide an introduction to some of the tools available to us and how they can benefit backcountry riding. However reading will never be able to replicate the experience of being in the mountain and I would recommend anyone who wants to start spending time in the backcountry to attend one of the many avalanche courses available and venture out with experienced riders or invest in guiding and instruction for your first couple of years.

Attending an avalanche course will provide you with an understanding of the snowpack and what avalanche danger ratings represent, how to avoid and recognise avalanche terrain and how to minimise risk when travelling across it and finally how to manage a rescue situation. Here we will be covering the equipment needed to access the backcountry and how each tool works.

skier hiking ridge
Hiking up Mount Yotei, Japan.

Backcountry Tools

The four key tools needed for backcountry travel will be a transceiver, probe, shovel and backpack. These are essential items and you will need all four in a rescue situation. We will now go through each item and discuss the part they play.

Transceivers

A transceiver is attached to your torso with a harness and sends out radio signals. As soon as you enter the backcountry it will need to be turned on so it is transmitting a signal. Every individual in the group will need one. In the event of an avalanche you are able to turn transceivers into a search mode and it is the tool used to find casualties under the snow. Transceivers can be digital or analog and it is critical you understand how the model you use works. This is where courses and search training exercises are vital. Practice in safe environments is the best way to get familiar with rescues and build trust amongst you fellow tourers.

Probe

A probe is essentially a long lightweight metal pole with a quick draw cord running through its length. Similar to a tent pole it collapses down into connecting parts to make carrying it easier. The cord through the middle means you can snap the pole together into one length by pulling the looped handle at the top. The other end of the probe has a rounded point for penetrating the snow. The probe is used when the transceiver has located the rescue site and probing is needed to locate the casualty under the snow.

Shovel

There is no ‘rocket science’ here the shovel is what is used to dig the casualty out once the search has been completed. Modern backcountry shovels are made from lightweight metals and the handle will be able to detach or compact in some way to reduce space and weight in your backpack. The shovel is also the most adaptable tool in your bag fantastic for shaping snow chairs for lunch, digging snow holes in desperate times, building booters for that go pro moment or tobogganing back from apres!

Backpack

A good touring backpack will have multiple designs to facilitate comfortable and practical backcountry travel. Common features will include secure ski/snowboard carriage, quick access safety pockets so you can get to the above equipment without wasting time, back support and customisable fit.

ABS Bags and Avalungs

The above equipment is the bare necessities for anyone who wants to explore beyond the resort slopes, however there have also been two developments in avalanche safety in the last decade which are worth noting. These are ABS bags and Avalungs neither will ever eliminate the danger of avalanches but do provide some form of preventative measure towards the risks. ABS bags are essentially a large inflatable within your backpack that can be triggered in an avalanche to increase your surface area to reduce the chances of being buried. Whilst Avalungs are a breathing tool that takes CO2 away from you when you are buried. This buys you and your rescuers more time which is hugely beneficial when you look at the statistics involved with drowning in Avalanches. These tools have made backcountry travel safer than ever however as a cautionary note I will say this. No piece of equipment will ever be 100% foolproof and to truly minimise the risks, educating yourself in when and how to travel in the backcountry is the most important factor.

avalung 2 from black diamond
Avalungs are a breathing tool that takes CO2 away from you when you are buried. This buys you and your rescuers more time which is hugely beneficial when you look at the statistics involved with drowning in Avalanches.

I hope this article helped people to get an idea of the basic equipment needed in the backcountry and look forward to everyone having a snowy winter wherever you are!Facebooktwitterredditpinterestlinkedinmailby feather

Skiing Powder In Rusutsu, Japan

Rusutsu is located on the other side of Mount Yotei and takes about 40 mins to get to from Hirafu where we are based. It is somewhere I have wanted to ski since seeing an article a few years ago about some locals who have built a side country park in the forest. It is built solely from fallen wood and was built in the summer season before the snow came in the winter. It has created a truly unique ski environment which fuses both elements of park and the backcountry. With all this in mind I was stoked to be on the bus heading towards Rusutsu.

skier powder skiing

When you arrive in Rusutsu it is a bizarre winter wonderland, the resort consists of just one large hotel and that is situated next to a huge closed theme park. It makes for an amazing scene with ferris wheels and roller coasters coated in deep pillows of snow with a serene almost eery ambiance created by the lack of people in the area. It is the biggest ski area in Hokkaido with three separate mountains but few people stay here and the only visitors seem to be the people day tripping on the bus. This makes for one of the most incredible resorts I have ever been to. We arrived to waste deep fresh powder and were doing lap after lap without seeing anyone.

skier backcounrty powder

The terrain is the best I have seen in Japan yet, with longer vertical and a really fun spacing in the trees making for an epic day. We found some good pillows early in the day just under the chairlift and spent the morning sessioning them, before moving over to the side country park.

The side country park is an incredible feat allowing you to ski features you could only dream of in back country terrain accessed by a chairlift. There are rainbow trees, tree gaps and man made pillows made from scaffolded platforms. I had a couple of hours checking out the features and can’t wait to return on a big powder day as there are endless options for progressing your skiing. By the end of the day it was hard to think of a better day skiing. We had ridden empty powder for the best part of eight hours without seeing anyone in some of the most playful terrain you could think of. I will no doubt be calling Rusutsu my second home now!

 Facebooktwitterredditpinterestlinkedinmailby feather

Japow – Skiing In Japan

On the 2nd of December 2015 I left the UK heading for the northern island of Hokkaido in Japan. The region is known for having some of the biggest recorded snowfalls in the world and offering fantastic tree lined powder skiing. Skiing in Japan has been a dream for the last ten years and I cannot wait to explore the skiing and culture of Japan this winter.

powder skiing in japan
Skiing in Japan has been a dream for the last ten years!

Arriving in Grand Hirafu at the base of Mt Annupuri  you cannot help but be overwhelmed by the amount of snow that has already fallen. Tree branches and buildings appear to be frozen in time  whilst  storms just continue to roll through this remote region. The first 5 days of our trip we rarely got to see past the first 20m due to the snow and certainly didn’t get a view of the surrounding valley. The snow itself is unlike any powder I have skied, it has an incredible spring to it that projects you out of each turn.  The first few days were amazing we hadn’t started work and enjoyed fresh snow everyday.

When the storm finally passed we were able to see the dominating view of MT Yotei that towers over the valley; it is an active volcano that rises from 200m above sea level to 1800m. It is by far the biggest peak in the area and is commonly referred to as Little Fiji, in Japan. This peak will be one of the goals for my touring this season, in the right conditions you are able to climb the peak and ski down into the crater of the volcano a truly once  in a lifetime experience.

mt yotei
Land of the rising sun; Mt Yotei.

The following clear days we took some treks out to the base to explore  the National Park and started to get our legs ready for the first tour of the winter. Having seen most of the fresh snow ‘skied out’ in resort we decided to head into the backcountry. We set off at the resort of Annupuri and ventured into the valley behind the mountain with the aim of getting to the peak a solid 1000m vertical warm up. Touring is actually easier here due to not having to deal with high altitudes and we enjoyed cruising up through the bamboo and silver birch forest to the first ridge. With the peak in our sight we estimated we had maybe another two hours to go, however, another blizzard rolled in making the final 200m some of the snowiest conditions I have been in. Despite the conditions, and with some good route planning, we found the refuge on the peak and sheltered from the storm. It was impossible to go back the way we came due to the weather so dropped back over the front down to resort. It was great to get the legs back in but a shame we didn’t get to do the descent we wanted. However it certainly opened our eyes to the quality and expansiveness of the terrain in this area.

The storm that hit us on our tour stuck around for four days so we have been again enjoying fresh turns every morning.  The consistency of snow here gives you a different perspective on skiing as you can wake up everyday knowing that you will be riding powder. The potential to improve that side of your riding is  amazing and I hope this winter I will be able to do just that; skiing in Japan.

I will keep you all posted on the Japanese adventure in the coming months, Rob.Facebooktwitterredditpinterestlinkedinmailby feather

O’Neill Psycho 3 Wetsuit Review

Surfing in Scotland.  Tallington Lakes Pro Shop kindly armed me with an O’Neill Psycho 3 wetsuit for the trip and I was keen to push it to its limits in the cold seas that surround Scotland.

On the Wednesday and Thursday there was a large swell on the east coast so we decided they would be the best days to head to the surf. We travelled towards Aberdeen and made our way south finally jumping in at Lunan Bay. This was a great reintroduction to Scottish surfing; it is a wild and rugged country and the seas around it seem to reflect that. The surf on the east coast were generally messy but it was great to get some water time before we headed to the reefs and slabs of the north.

From the Cairngorms we made our way along the coast to Inverness and then started the long drive to the northern tip of Caithness. The surfing in this area in my opinion is world class. It offers a huge variety of waves from long mellow points to thick heavy slabs. Having already done two trips to this region we also explored further west into Sutherland and again found plenty of empty line ups to keep us entertained.

surfing in scotland
To say the trip was ideal testing conditions for a winter wetsuit would be an understatement.

To say the trip was ideal testing conditions for a winter wetsuit would be an understatement. The weather is constantly changing with rain and gale force winds. The water temperature despite being relatively friendly in October compared to deepest darkest January is certainly cold enough to put this O’Neill wetsuit through its paces.

The first thing you notice about the O’Neill Psycho 3 wetsuit is how light it is. The new TechnoButter technology, which is a honeycomb neoprene, means that the suit is not dense and has a light foamy texture. The weight of the suit is actually comparable to a 3mm/2mm summer suit when dry. As I got changed I noticed that the suit is extremely flexible; however it is worth noting that with this flexibility you have to be careful when putting the suit on because it feels like you could easily over stretch it or tear it if you pulled too hard.

The seams and seals on the suit are extremely impressive and even through some pretty heavy wipe outs I didn’t find that the suit flushed. The majority of the waves we surfed were over granite slabs and plenty of times you find yourself being dragged along the bottom. Fortunately the suit never split or tore in this situation. Obviously there is a certain degree of luck in the way you fall; but plenty of people did tear their suits on the reef. So I would conclude that the TechnoButter neoprene is tough as well as light.

Actually surfing in the 5mm wetsuit was pleasurable, as surfing can be in such a thick suit. I found due to the flexibility and lightness of the wetsuit, I didn’t tire as quickly paddling as I have in previous suits, and was able to surf for the best part of 5-6 hours most days. These benefits also extend to your ‘pop up’ and surfing; and you feel incredibly nimble for being in such a thick suit.

surfing scotland
A secret reef somewhere in the North, Scotland!

Overall I would highly recommend the O’Neill Psycho 3 because it made surfing, in Autumn, in Scotland an easy task and handled the conditions better than the suits I have worn on the previous two trips. However I would advise if you purchase this suit to treat it with care, similarly to most top end suits you are paying for flexibility but with this they can easily be pulled or stretched. So always hang the suit from the waist on a hanger and always take some thing to change on, especially in gravel car parks, as it would be a shame to ruin suit before you even got in the water.

Note: O’Neill  discontinued the Psycho 3 for winter 15/16 and replaced it with the Psycho Freak ZEN and Psycho Freak FUZE wetsuits. They are the same suit just different ways to climb in! The wetsuit technology is almost 100% the same as the Psycho 3 but O’Neill have extended the ‘fire wall’ inside the suit all the way to the bottom of the legs – toasty!

You can view more men’s O’Neill wetsuits here.Facebooktwitterredditpinterestlinkedinmailby feather

How To Film Skiing With A GoPro?

The innovations in point of view (POV) cameras in the last five years have changed the way we are able to capture our favourite action sports. However it seems sometimes that the footage people get from there action camera doesn’t quite live up to there expectations. I thought I would write a short blog on how to film skiing with a GoPro and get the professional looking results you are hoping for.

The first step in making a great edit is having a clear idea of the shots and footage you want before even leaving the house. The gift and the curse of POV cameras is that they are capable of shooting anywhere and anything, this means we can end up with hours of footage on the memory card much which will never be used or even replayed. Having a concise vision of what you want to film can save hours of trawling through your memory card waiting for a useable shot. Angles to shoot from are endless with a GoPro but where they excel is from a close intimate angle as the fish eye lens captures images at such a wide angle. With this in mind the key to getting consistently good results is making sure the camera is close to the point of action you are trying to capture. This can be achieved by the huge variety of GoPro mounts which are available and allow you to self film but is more critical if you filming somebody else.

So once you have a clear idea in your head you can go out and get the shots you want this is where a basic understanding of the camera settings comes into play. The latest GoPros are able to shoot at 120 fps (frames per second) in 1080HD or 60 fps in 4K however there are a variety of different shooting modes beneath these. So what setting should you use when, basically the highest quality shot will require shooting in 1080HD or 4K on the newest models. This setting will mean the cameras is taking in the most information it can,providing the highest image quality when replayed. However shooting in this mode means you will compromise the fps rate. This is where having an idea of what you want to achieve is important. The higher the frame rate the better the quality if you want to slow the shot down, so to achieve that super slow motion effect used so often in GoPro videos you need to be shooting in the highest frame rate – ideally anything above 60 fps will you good results when slowed down.

In regards to getting the best results in slow motion there are a couple of things to consider when actually filming. Firstly try and keep ‘camera shake‘ to a minimum; there are a vast selection of accessories to help with this from pole mounts to tripods. I recommend making the small investment as it will really improve the quality of your images. Secondly reducing the ‘background’ noise in the frame means it is easier for editing software to link the frames when slowed down. So try to film the action with a blank background for example if someone is doing a jump try to make the backdrop the sky this will result in smoother images when slowed down.

A final thought in regards to getting the most from your GoPro is choosing the days you film and how you film. If you look at any of the professional GoPro clips online you will see a common theme they are all shot on the brightest days. The images on these days will always have better contrast and will really come alive on your screen. However skiing isn’t always blue skies and sunshine if you do end up wanting to capture that epic white out powder day you will need to do some after editing. To achieve that same definition in your images you will need to increase both contrast and saturation whilst reducing exposure. The free GoPro Studio is a great bit of software to start learning the basics of editing and improve your film making skills. It also has fantastic compressor which will reduce the final file size of your edits, due to the quality of GoPro footage quite often files can be large so this a great feature especially if you like sharing you edits on social media.

Hope this has been useful and you enjoy going out and capturing your next big adventure!Facebooktwitterredditpinterestlinkedinmailby feather

Skiing The Bec Rouge Couloir

I have spent the last eight years wanting to ski the Bec Rouge couloir, and could hardly contain my excitement when we set off at 6am! The
conditions were epic with blue skies as far as you can see, a foot of fresh snow and temperatures set to stay at -10°C all morning.

Halfway through the two hour climb we had the privilege of meeting Marcel Gaidet; who ended up joining us for the remainder of the tour. Marcel’s son Manu was a three times World Freeride Champion. The wealth of knowledge that Marcel has of these mountains was phenomenal and I learnt so much in the remainder of the day.

two skiers
Marcel Gaidet (left) a true inspiration.

Marcel is 67 this year and has had a hip replacement; however he still put in the first track near enough all the way to the top – his level of fitness was truly awe inspiring. To put it in to perspective he averages 50,000 vertical metres of climbing a winter compared to my usual of 10,000. To be around Marcel for the day was amazing. He is just out there doing it and enjoying himself; I can only hope that I am still skiing lines like this when I am in my sixties.

“You have waited so long for all the elements to come together there is so much that goes into it.”

After eight years of waiting the couloir couldn’t of had better snow conditions. It is hard to put into words what it feels like on days like this; you have waited so long for all the elements to come together there is so much that goes into it. It is probably the one side
of the sport that I feel as a whole people don’t appreciate. You have to be so patient, nature dictates the small windows of opportunity you have to ski these lines.

So when you get the chance, you are almost over whelmed. It is just incredible that so many variables can fall into place and that is what makes it so special, I just hope I don’t have to wait another eight years to do it gain!Facebooktwitterredditpinterestlinkedinmailby feather